Many photographers are overly interested in equipment (sometimes seeming more interested in the gear itself than in actually using it), and a common article is the self-indulgent listing of what the particular photographer typically carries in their shooting bag. Working under the delusion that my preferences might matter to anyone other than myself, here is yet another such article.
 The bag itself is a Tamrac Express 6 http://www.tamrac.com/3536.htm , carefully selected on the basis of being won for a minimum bid on eBay at a cost, shipped, of less than $10. The bag has two partitions that divide the main compartment into a center/top section with two side sections. The bag is typically loaded as follows:
Center/top section – E-P1 with either 14-42mm micro four thirds zoom or standard four thirds 40-150mm zoom and MMF2 adapter mounted, and the other of these two lenses either at the bottom of this section, on the right side (40-150), or on the left side (14-42), depending on whether other lenses are being carried. Which of the two is mounted depends on expected shooting; typically, it is the shorter-length zoom for landscapes. The camera body is in a Chinese synthetic leather half case, with the shoulder strap attached to the case and folded atop the camera when bagged. The full-sized 40-150mm was selected on the basis of being half the price of the micro four thirds version at the time, with the adapter included. For $200 saved, I can live with carrying the extra 71g mass. Since I have a collection of 55mm filters for my Konica lenses, this lens is fitted with a 58mm-55mm step down ring and 55mm pinch-center cap.
Right side – Most often, nothing. Frequently, a Tamron SP 90mm/2.5 macro lens w/ Adptall 2-to-Konica AR adapter and Konica AR-to-Micro Four Thirds adapter (“Fotasy” brand, which appears to be significantly better quality than the “Pixco” brand that I first bought – note the added fluorescent index dots on the sides). This provides the effect of a 180mm macro lens in 35mm, and provides couple of stops improvement over the 40-150mm. Alternately, to give a bit longer reach than the 40-150mm, a Konica Hexanon 200mm/4 fitted with the Fotasy adapter. Konica’s 80-200mm/4.5 zoom might be a better choice, offering closer focusing distance and only slightly greater weight, but the diameter is just a bit large for the bag, making it a struggle to insert or pull out. A significantly heavier alternative is a Vivitar 200mm/3.5 lens (in Konica AR mount) I couldn’t resist for $11 shipped off eBay, which is also a bit longer and thus makes for a tight squeeze to fit the camera in on top. If I expect to shoot in very dim light w/o flash, I will substitute a Konica Hexanon 50mm/1.4. On rare evening occasions when I think it will be used, the flash (Vivitar DF-183) may replace any lens on this side.
Left side – The bag has a small horizontal flap partition which I use to separate off the bottom of this side, and my seldom-used Soligor 1.5X teleconverter for Konica AR lenses (giving a dim, shaky option for an effective focal length on 600mm with one of the 200mm lenses) skulks at the bottom on this side (if carrying the 90mm Tamron lens, this may on rare occaisions be replaced with a 2X teleconverter). The space above is either empty, holds the 14-42mm MFT zoom, or holds a shorter legacy lens with a wider maximum aperture than the MFT zoom. This is most frequently a Konica Hexanon 40mm/1.8, less commonly a Tamron Adaptall 2 24mm/2.5. Either of these lenses are mounted to the Pixco Konica-to-MFT adapter, reasoning that the slightly loose fit will not be as great a concern with these shorter focal lengths.
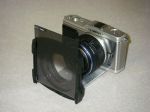
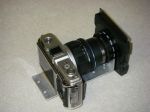
Front pocket – Two spare camera batteries carried in an Egyptian motif cigarette case from China that I found on eBay during an unrelated search. Ziplock bag containing a puffer brush (a 20+ year old model that still works far better than one that came in a more recent cleaning kit) and a microfiber lens cleaning cloth. A couple of spare SD cards in their plastic cases. 55mm collapsible rubber lens hood (this came with the first lens I ever bought, the Konica 80-200mm/4.5 zoom, and after 25+ years is still supple with no signs of cracking or brittleness). 55mm filter stack – base end is a 46mm-55mm step-up ring with a removable circle of matte board inserted into it to close it off; filters are a polarizer, a Minolta No. 1 achromatic close up diopter (which allows macrophotography with the 40-150mm zoom or whatever 200mm lens is carried), and a seldom-used UV filter for adverse conditions; during foliage season, I may also add in a red-enhancing didymium filter; top end is closed by a spare 55mm lens cap. 46mm filter stack for the 14-42mm zoom – base end is a 40.5mm-46mm step-up ring, closed with a removable circle of 0.02″ styrene plastic; currently, the only filter is a 46mm polarizer, and the stack is completed with a 46mm lens cap. 46mm collapsible rubber lens hood modified to allow use without straining the focusing motor of the 14-42mm zoom – the rubber hood was removed from the original clunky metal ring and glued onto a 46mm-52mm step-up ring, and then the open end was cut back about 1/4″ until I could get the lens’ autofocus to operate without complaint. Simply shading the lens with my left hand is often more convenient, as using the hood requires removing the step-up ring from the 46mm stack. Ultra-Pod – a light table-top ball-joint tripod that is just barely able to support the E-P1 with smaller lenses, sprayed in Krylon’s “hammered copper” Fusion paint to try and give it a more “steampunk” look. Likely to be replaced with the larger Ultra-Pod II some day. Grad ND filter – Typically a Cokin A121, sometimes a Cokin P121M. Either is typically handheld, rather than using a holder to mount it on the lens. This can alternately be carried in a zipper pocket formed in the top flap (as can the cleaning kit). Spare AA batteries.
Top flap pocket – Thin leather gloves. 1 gallon plastic food storage bag and a coule of rubber bands (not shown).
Side cell phone /MP3 player /GPS pocket – Unused.
Side flat pocket – Unused.
Back flat zipper pocket – Unused.
Just because the manufacturer adds a pocket does not create any obligation to find something to put in it.